Scuba (and ski / motorcycle) gear drying rack
Earlier this summer I designed and built a scuba gear drying rack that can be broken down for storage and transport. It's a tricky problem - wet scuba gear is heavy, and there's a lot of gear, and it takes a lot of space to hang it all up.
I've seen other people who built racks, but then were frustrated with those racks because they would fall apart under all the weight, or be a pain to store or transport. I wanted to set my mind to making something better.
My goals, in priority order, were:
- Can hold a lot of gear, in terms of both volume and weight.
- Can be taken apart for transport and storage.
- Can be assembled and disassembled quickly and easily.
- Is inexpensive to build.
- Is easy to build.
Here's what I came up with:
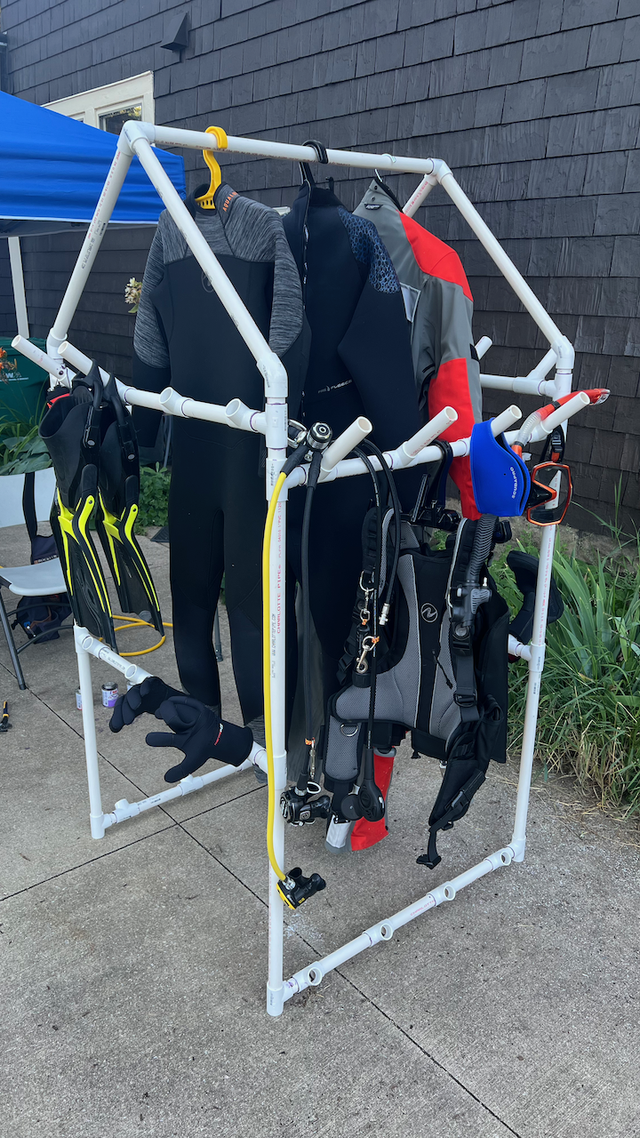
And I'm very happy with it!
I worked hard to optimize this design:
- It has lots of space! It can comfortably hold the gear for two people, and you could squeeze a third person's gear onto it, if needed.
- It's strong enough to hold all that gear! I used 1" PVC, which is the biggest that will work with standard wetsuit hangers. And the glue joints, and arrangement of the horizontal braces, are carefully chosen so the structure won't bow or twist once assembled, even under weight. It has proven perfectly strong, in use.
- It's tall enough for a drysuit, or a full-body motorcycle suit (woo Aerostich!), or ski gear. (And it could easily be made taller, at assembly time.)
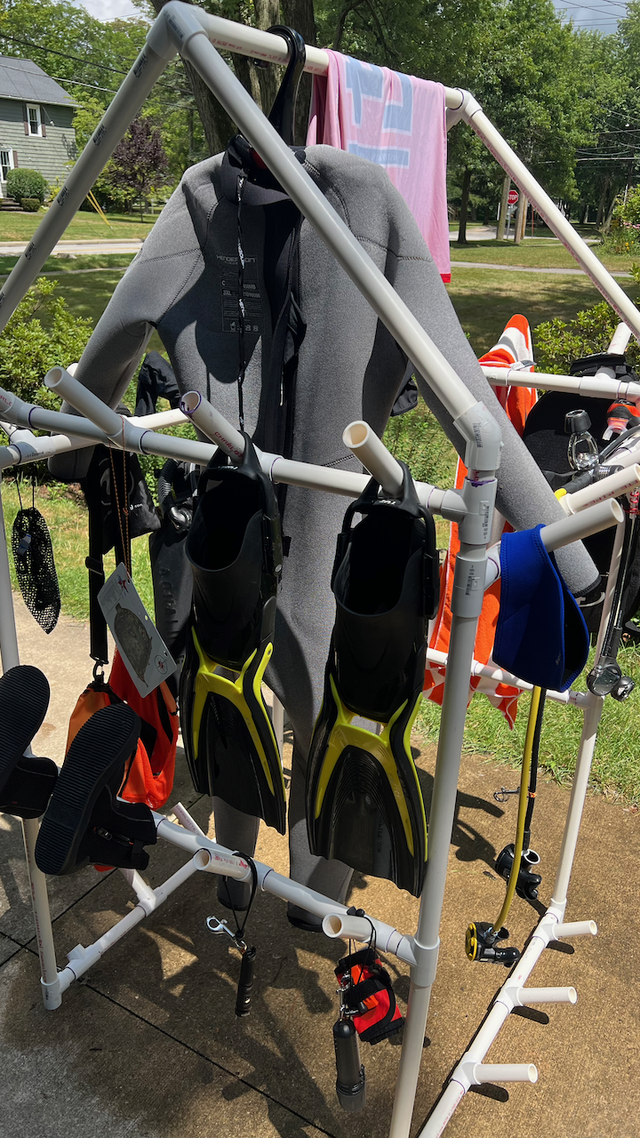
- The spacing lets wetsuit arms drape over the side racks so they air out better. (Not shown in this picture, but see the other pictures below.)
- It has space for BCDs, both vertically (above the ground) and horizontally (next to the wetsuits).
- It's easy to set up specialized "hooks" for boots and hoods.
- It's (relatively) easy to build!
- It's easy to assemble!
Shopping list
There are only 5 distinct things to buy at the hardware store:
- PVC pipe. I bought a 10 pack of 10' lengths, but only used 8 of them.
- "T" joints. Lots of them - I used 48!
- 3-way joints. 2 at the very top.
- 45° joints. 4 for the diagonals at the top.
- Optional "L" joints. For boot hooks and hood hooks; I bought 8. (See below for how they were used.)
You'll also need PVC cleaner, primer, and solvent. (So 8 things, actually?)
...and yeah, this design has a lot of glueing. (Or really, "solvent welding" - PVC connections are permanent!) But it's necessary, or the whole thing will bow under weight, and fall apart.
If you haven't glued PVC before, here's a guide for how to do it. You don't have to be nearly as careful as they describe, though - these pipes don't have to be liquid-tight! So it's OK to be very sloppy. And by the time you've done all these joints, you'll be an expert, and ready to do it for any real plumbing jobs! 😜
I also bought a 42" hockey bag to store and transport it in, when disassembled. (That bag was the right length, but a little taller than necessary. It works well overall.)
Overall cost was under $200 for the pipe and fittings, and about $45 for the bag.
Construction
This design also minimizes the number of distinct "components" that have to be made:
- 12 uprights, i.e. 24" pieces of PVC pipe. Just cut these lengths.
- 32 "hook" pieces - 6" pieces of PVC pipe. Just cut these lengths.
- 6 horizontal braces, with T joints at the end for structure, and T joints across the middle for "hooks". I used 4 hook spots on each brace, because that fits the stuff comfortably and gives a lot of hooks. But this took a lot of glueing, so you might want to only do 3 hooks per brace. (More details on these parts below.)
- 2 special horizontal braces that support the top of the rack (with those same 4 hooks per brace, in my build). Note that these have 4 (each) very short pieces of pipe for the vertical connections.
- 1 special brace at the top, that the suits hang on.
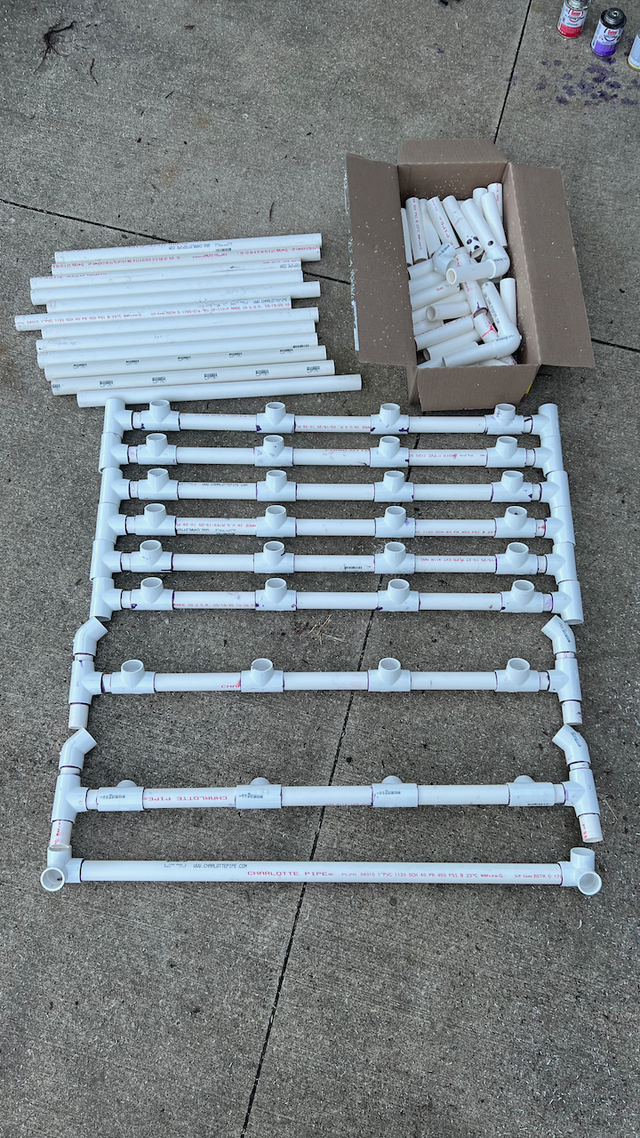
So to build this rack... basically just cut and glue all those components, and you're done! I used my power miter/chop saw to cut all the PVC lengths, to make it fast and easy to do the cuts. But there are lots of other ways/tools you can use to cut them, if you don't have such a saw. I suggest searching for tips, if you aren't sure how.
The specific pipe lengths for the cross braces are 2.5" for the end pieces and 8" for the middle pieces. Two of the cross braces are those special ones that go at the top, and they each have 4 extra 2.5" vertical pieces. So across all 8 cross-braces, assuming you use 4 T joints for hooks in each brace, that means you need 24 2.5" pieces and 24 8" pieces.
Be careful to glue all the T-joints at the correct angles, so the "hooks" will stick out at 45° relative to the uprights. I found that it was easiest to build the middle sections first (pipe + T + pipe + T + pipe + T + pipe + T + pipe), with all the T joints aligned. Then glue on the end T joints, at 45°. (Then glue in the extra pieces for those two special braces that go at the top.)
The PVC pipe length for the very top brace (that the suits hang on) was 35", I think - but I suggest waiting until you've built the regular cross braces and just measuring that top brace to match.
If you wanted, you could glue the "hooks" (the 6" pieces of pipe) into their corresponding joints, which would make it faster to assemble and disassemble the rack when you use it. But that would also make it much bulkier to store, disassembled, so I didn't do that.
I ended up with a few offcut pieces of pipe of arbitrary lengths, and I just kept those as additional hooks - they are still useful, for various bits of gear.
Assembly
The limited component set also makes it easy to assemble - there's really only one way to put it all together, and it's easy to see all the parts after setting them out. You just push the uprights into all open joints at the ends of all the braces, and that's it!
To disassemble, I find it helps to find one loose upright and get it out, then use that like a hammer to bang apart the rest of the joints.
The overall structure is about 36" wide and deep, and about 7" tall. It can be made taller just by putting extra lengths of pipe in the bottom of the very bottom T joints.
More pictures!
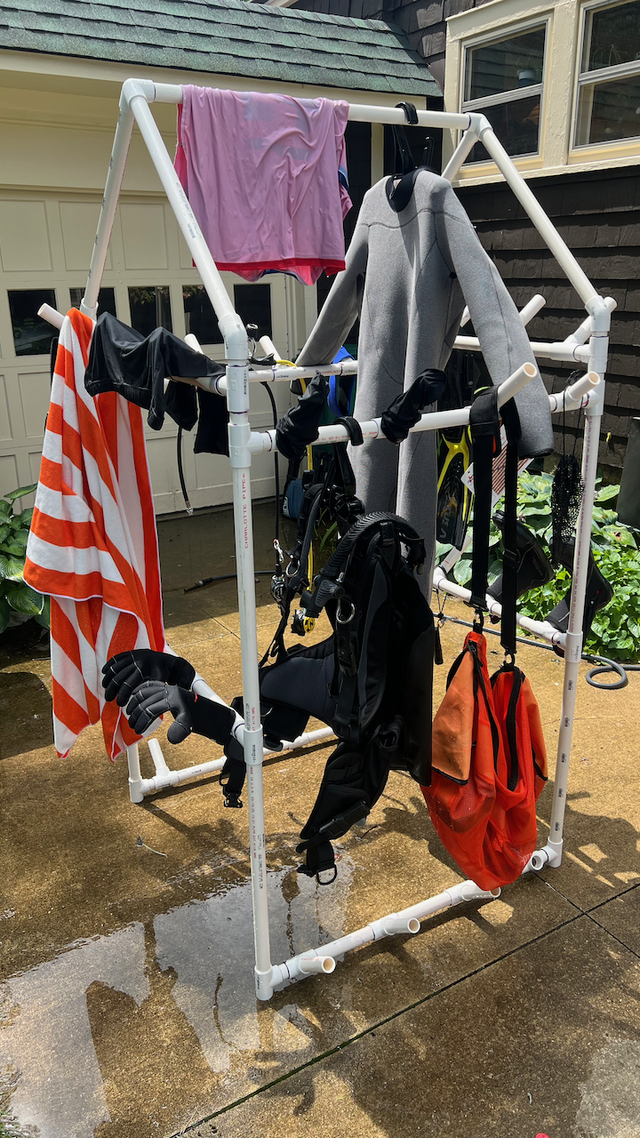
Here's the rack actually in use, with just my gear:
Here's that same day, from the other side:
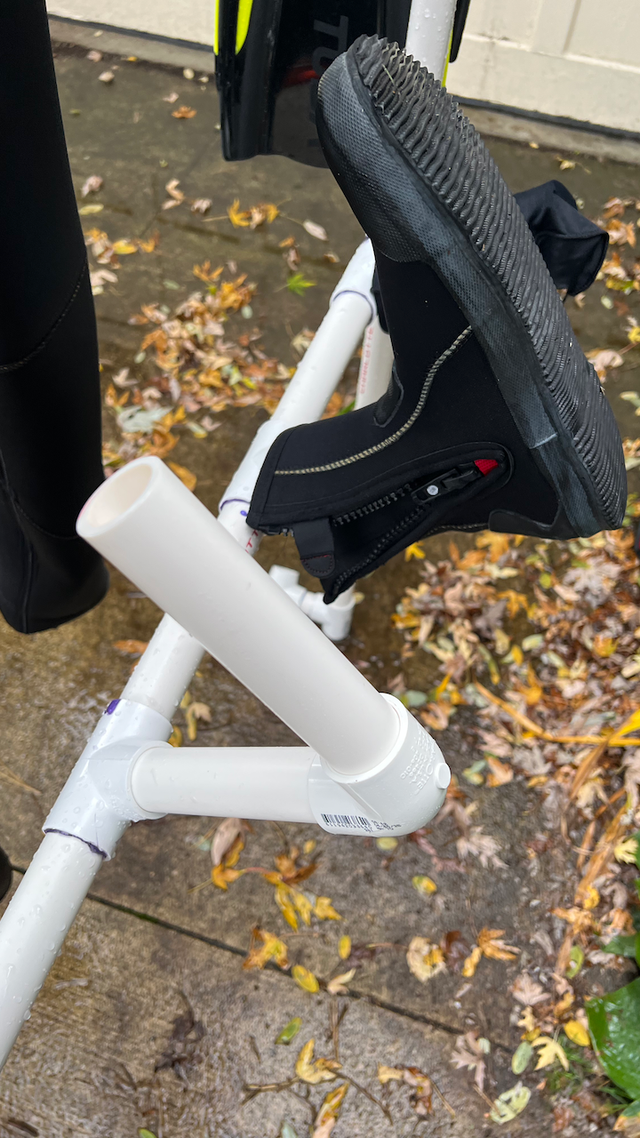
Here's how an "L" joint can be used to make a boot hook:
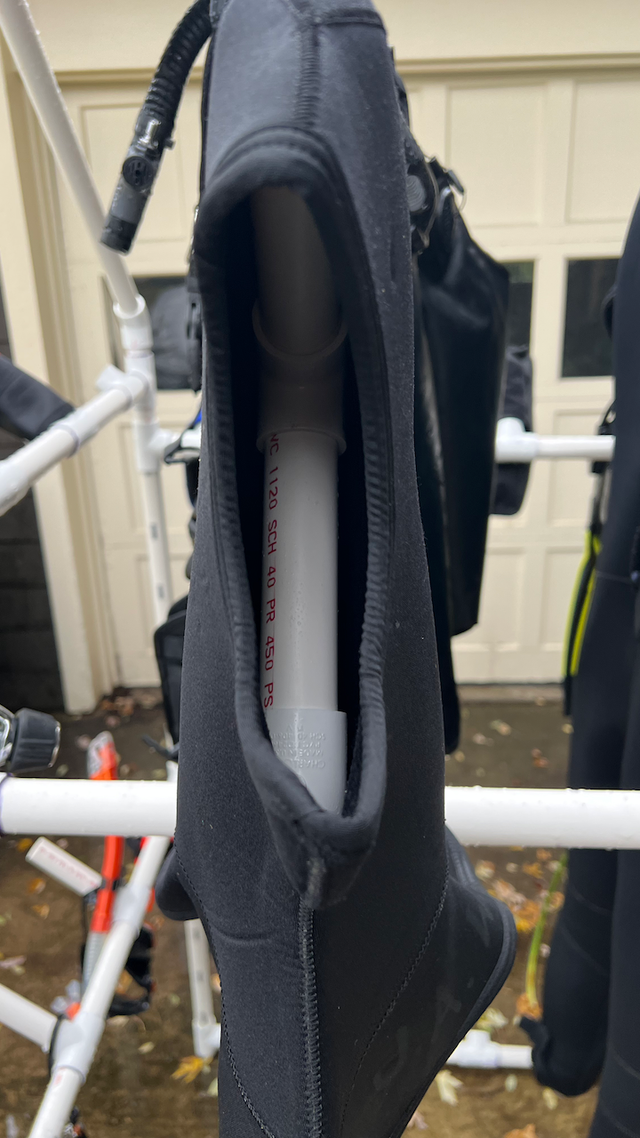
Here's how two "L" joints can be used to make a hood hook:
Additional thoughts
So far I haven't actually used this at a dive event. I've carried it to two events, but it just never seemed worth pulling out and setting up. If I had a dedicated dive buddy I was traveling with, I'm sure I would have used it.
But I've been thrilled with this rack as an at-home rinsing-and-drying rack! It's just the "portability" feature hasn't been as valuable as I expected.
This thing is fairly heavy... somewhere in the 30-50 pound range. I didn't anticipate that when I designed it. The weight is fine, but it was unexpected so I figured I should mention it.
The hooks on the bottom brace are very close to the ground... too close for most purposes. (They work OK for boots and gloves.) So it might make sense to not include those hooks at all, to simplify construction. (But that would complicate assembly, because it's another distinct component type that would have to be put in the right place!) I think if I ever really needed to use those hooks, I'd just put a few of the short pieces of pipe in the bottom T joints, thereby raising the whole rack up by 6".
It's theoretically possible to blow air through this thing and dry stuff out faster. There's even a clever way that you could use a "boot hook" (pipe + L + pipe) on the upper braces, such that the arms of the wetsuit would go onto the end of that hook, so you could blow air into the arms. You could maybe do something similar with the legs, if you just assembled the rack with the bottom-most cross braces reversed, so the hooks were going "in" instead of "out". (And yes, I thought of this when I designed it!) But it would require capping all the open holes, i.e. every single "hook". That seems like a lot of work, and a lot of extra expense, so I don't plan to try it.
And that's it! If you find this interesting, or have questions, comments, or build your own, please let me know on Mastodon!